Imagine biting into a warm, crusty loaf of bread that you made yourself—without any messy kneading or complicated steps. Yes, you can have fresh, bakery-style bread right from your own kitchen, and all you need is a Dutch oven.
This no knead bread recipe is perfect for you if you want delicious homemade bread with minimal effort. Keep reading, and you’ll discover how easy it is to create a golden, soft, and flavorful loaf that will impress your family and friends every time.
Ready to transform your baking game? Let’s get started!
Ingredients For No Knead Bread
No knead bread uses simple ingredients that you can find easily. These ingredients work together to create soft, crusty bread without much effort.
Choosing the right ingredients is important for the best bread texture and flavor. Let’s look at the key parts.
Essential Dry Ingredients
The dry ingredients form the base of no knead bread. They help the bread rise and give it structure.
- All-purpose flour:Use regular or bread flour for good gluten development.
- Salt:Adds flavor and controls yeast activity.
- Instant yeast:Helps the dough rise without needing to knead.
Choosing The Right Liquid
The liquid hydrates the flour and activates the yeast. Water is the most common choice for no knead bread.
You can use warm water to speed up fermentation. Avoid very hot water as it can kill the yeast.
- Room temperature or warm water (about 100°F or 38°C)
- Milk can be used for a softer crumb
- Some recipes add a little olive oil for richness
Optional Add-ins
You can add ingredients to change the flavor or texture of your bread. These are not required but can make bread more interesting.
- Seeds like sesame, poppy, or sunflower for crunch
- Herbs such as rosemary or thyme for aroma
- Garlic powder or onion flakes for extra taste
- Whole grains or oats for a nutty flavor
Preparing The Dough
No knead bread is simple to prepare and needs little effort. The dough only needs mixing and resting.
Using a Dutch oven helps create a crispy crust and soft inside. Let’s look at how to prepare the dough.
Mixing Without Kneading
Mix flour, water, yeast, and salt in a large bowl. Stir until all ingredients combine.
The dough will look sticky and rough. Do not try to knead it. Mixing is enough.
Ideal Dough Consistency
The dough should feel wet and sticky but hold together. It will be shaggy and loose.
If the dough is too dry, add a little water. If too wet, sprinkle more flour carefully.
- Sticky but manageable
- Does not crumble or fall apart
- Soft and elastic after resting
Resting And Fermentation
Cover the dough with plastic wrap or a cloth. Let it rest at room temperature.
The dough needs at least 12 hours to ferment. This helps develop flavor and texture.
- Rest in a warm spot
- Do not disturb during fermentation
- Dough will double in size
Using A Dutch Oven
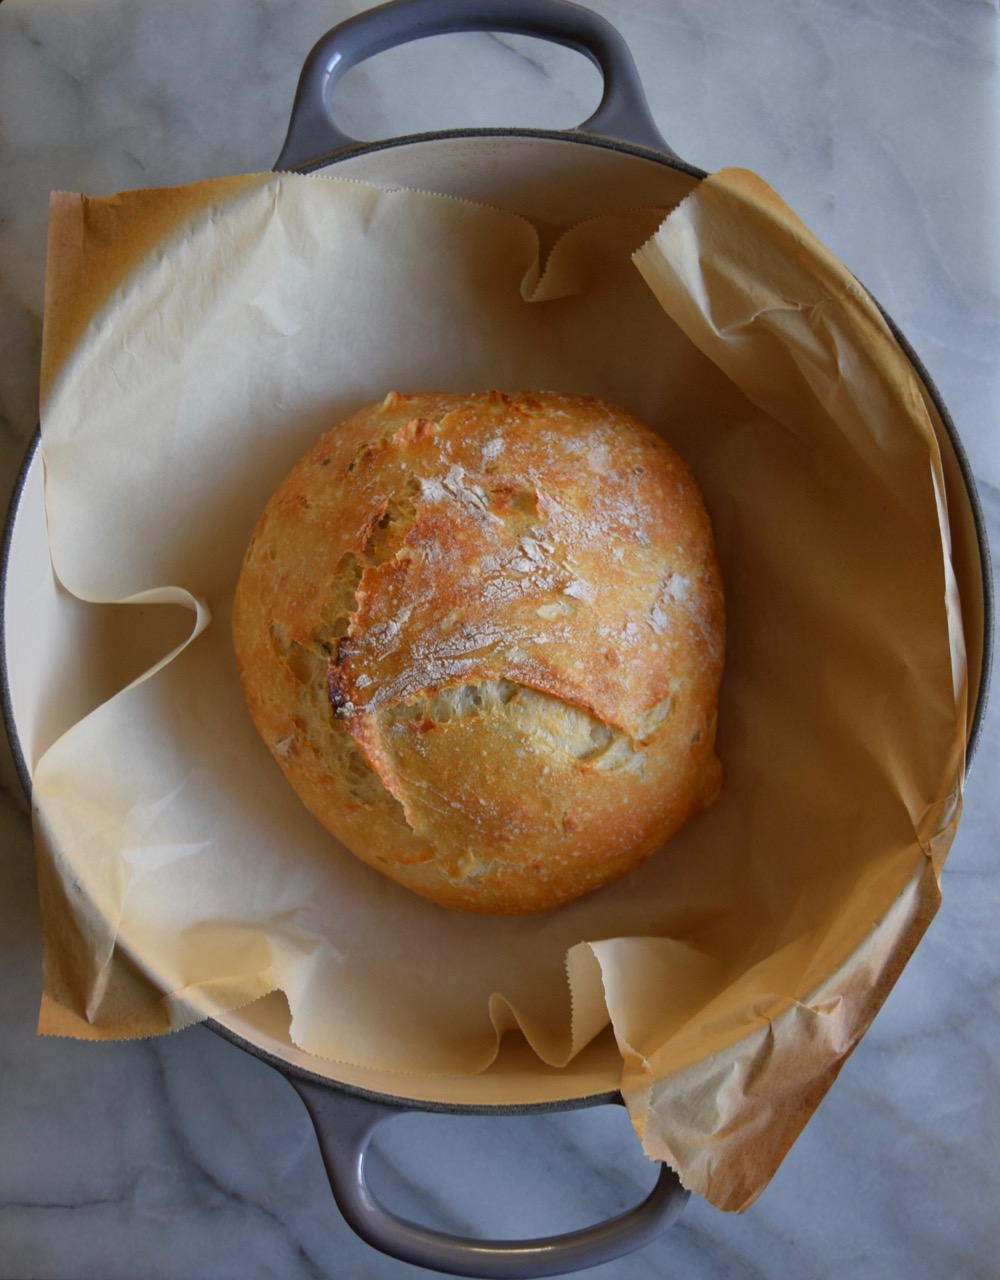
Making no knead bread in a Dutch oven gives the bread a crispy crust and soft inside. The pot traps steam, which helps the bread bake evenly. Using a Dutch oven is simple and makes your homemade bread taste great.
You only need a few key tips to use your Dutch oven well. This guide will help you select the right pot, preheat it properly, and handle it safely.
Selecting The Right Dutch Oven
Choose a Dutch oven that holds heat well and fits your bread size. Cast iron pots are best for baking bread because they keep heat evenly.
Make sure the pot has a lid that fits tightly. This helps keep steam inside, which is important for a good crust.
- Size: 4 to 6 quarts works well
- Material: cast iron or enameled cast iron
- Heavy lid that seals tightly
- Oven safe up to 450°F (230°C) or higher
Preheating Tips
Always preheat your Dutch oven before adding the dough. This helps create steam inside and gives the bread a crispy crust.
Place the pot and lid in a cold oven. Heat both at 450°F (230°C) for at least 30 minutes. Use oven mitts to handle the hot pot carefully.
- Put pot and lid in cold oven
- Heat at 450°F (230°C) for 30 minutes
- Use oven mitts to remove pot
- Place dough inside quickly to keep heat
Handling The Hot Pot Safely
The Dutch oven gets very hot in the oven. Always use thick oven mitts to protect your hands when you take it out.
Place the hot pot on a heat-safe surface like a wooden board or trivet. Avoid touching the pot with bare hands or placing it on a cold surface that might crack.
- Use thick oven mitts or gloves
- Set pot on a heat-safe surface
- Keep children away from hot pot
- Lift lid away from your face to avoid steam burns
Baking Process
Baking no knead bread in a Dutch oven is simple and rewarding. This method uses steam inside the pot to create a soft inside and a crispy crust.
The baking process focuses on shaping the dough, baking with the lid on and off, and achieving the perfect crust.
Shaping The Dough
After the dough rises, gently turn it onto a floured surface. Shape it into a round ball without pressing out the air.
Use your hands to fold the edges toward the center. This helps build tension and keeps the dough smooth on top.
Baking With Lid On And Off
Place the dough inside the preheated Dutch oven and cover with the lid. The lid traps steam, which helps the bread rise and develop a crust.
After 20-30 minutes, remove the lid. This allows the crust to brown and become crisp during the last part of baking.
- Start baking with the lid on to trap steam
- Remove the lid halfway to brown the crust
- Watch the bread’s color to avoid burning
Achieving Crispy Crust
High heat and steam inside the Dutch oven create a crispy crust. The steam stops the outside from drying too fast.
Removing the lid lets moisture escape and the crust harden. Let the bread cool before slicing to keep the crust crunchy.
Troubleshooting Common Issues
Baking no knead bread in a Dutch oven is simple but can have challenges. Some common problems may appear during the process.
Knowing how to fix issues like sticky dough, poor rising, or crust problems helps you bake better bread every time.
Dough Too Sticky Or Dry
Sticky dough feels wet and hard to handle. Dry dough cracks and does not come together well.
Add flour little by little if dough is sticky. If dry, add small amounts of water to moisten.
- Sticky dough: sprinkle flour and mix gently
- Dry dough: add water teaspoon by teaspoon
- Use room temperature water for best results
Bread Not Rising Enough
Bread that does not rise well may taste dense and heavy. This happens if yeast is weak or dough is cold.
Make sure to use fresh yeast and warm water. Let the dough rest in a warm place to rise fully.
- Check yeast expiration date before use
- Keep dough covered and warm during rising
- Give dough enough time to double in size
Crust Not Crispy
A soft or pale crust means the bread did not bake with enough heat or steam. The Dutch oven helps create steam.
Preheat the Dutch oven before baking. Bake with the lid on to trap steam, then remove lid for browning.
- Preheat Dutch oven at baking temperature
- Cover dough with lid for first 20 minutes
- Remove lid last 10-15 minutes for crisp crust
- Use high oven temperature as recipe suggests

Credit: www.talesfromthekitchenshed.com
Serving And Storing
No knead bread made in a Dutch oven is crusty and soft inside. Proper serving and storing keep it fresh and tasty.
Learn how to serve it best, store it well, and reheat it to enjoy every crumb.
Best Ways To Serve
Serve your no knead bread warm or at room temperature for the best taste. It pairs well with butter, cheese, or soup.
Slice it thick or thin depending on your meal. It is perfect for sandwiches or just dipping in olive oil.
- Warm with butter or jam for breakfast
- As a side to soups and stews
- Use for sandwiches or toast
- Dip in olive oil or balsamic vinegar
Storage Tips To Maintain Freshness
Store the bread in a paper bag or bread box to keep the crust crisp. Avoid plastic bags as they make bread soft and soggy.
If you want to keep it longer, wrap it tightly and freeze. Thaw it at room temperature before eating.
- Use a paper bag for short-term storage
- Keep bread in a bread box or cloth bag
- Freeze bread in foil or airtight bags for longer storage
- Thaw frozen bread at room temperature before use
Reheating Suggestions
Reheat bread in the oven to bring back its crusty texture. Avoid microwaving as it can make bread chewy or hard.
Wrap the bread in foil and heat at 350°F (175°C) for 10-15 minutes. This warms the bread without drying it out.
- Preheat oven to 350°F (175°C)
- Wrap bread in aluminum foil
- Heat for 10-15 minutes
- Avoid microwave reheating for best texture
Variations And Flavor Ideas
No knead bread in a Dutch oven is easy to make and tastes great. You can add many flavors to make it special.
Try different ingredients to change the taste and texture. This makes your bread unique every time.
Adding Herbs And Spices
Fresh or dried herbs add a nice aroma to your bread. Spices can give a warm or spicy flavor.
Mix herbs like rosemary, thyme, or oregano into the dough. Add spices such as garlic powder or paprika for a twist.
- Rosemary and sea salt for a classic taste
- Thyme and black pepper for a subtle kick
- Garlic powder and chili flakes for heat
- Oregano and basil for an Italian style
Incorporating Seeds And Nuts
Seeds and nuts add crunch and extra nutrition. They also change the bread’s texture and look.
Try sunflower seeds, pumpkin seeds, or walnuts. Sprinkle them on top or mix inside the dough.
- Sunflower seeds for a mild nutty flavor
- Pumpkin seeds for crunch and color
- Chopped walnuts for a rich taste
- Sesame seeds for a toasty touch
Sweet And Savory Twists
You can make your bread sweet or savory by adding different ingredients. This changes the bread’s mood.
Try adding cheese and herbs for savory bread. Add cinnamon and raisins for a sweet version.
- Cheddar cheese and chives for savory bread
- Olives and sun-dried tomatoes for a Mediterranean flavor
- Cinnamon and raisins for a sweet, warm bread
- Honey and nuts for a sweet crunch

Credit: www.talesfromthekitchenshed.com
Credit: glorifiedhobby.com
Frequently Asked Questions
What Is No Knead Bread?
No knead bread is an easy bread recipe requiring minimal effort. It involves mixing ingredients, letting them rise, and baking. The dough develops gluten without manual kneading. This method is perfect for beginners and those seeking a simple baking experience.
Why Use A Dutch Oven For Baking Bread?
A Dutch oven traps steam, creating a perfect crust. The enclosed environment mimics professional steam ovens. It ensures even heat distribution and moisture retention. This results in a crisp crust and soft interior, enhancing the overall quality of the bread.
How Long Should No Knead Bread Rise?
Typically, no knead bread should rise for 12 to 18 hours. This extended time allows gluten to develop naturally. The long rise enhances flavor and texture. A cooler environment might require a longer rise, while warmer conditions can shorten it.
Can I Add Ingredients To No Knead Bread?
Yes, you can customize no knead bread with various ingredients. Try adding seeds, nuts, or herbs for extra flavor. Ensure any additions are evenly distributed in the dough. This allows you to create a unique bread tailored to your taste.
Conclusion
This no knead bread recipe is simple and fun. You need only a few ingredients and a Dutch oven. The bread turns out crusty outside and soft inside. It fills your home with a warm, fresh smell. Baking bread like this can save money and time.
Try it once, and you might bake often. Enjoy homemade bread with your family and friends. This easy recipe fits any kitchen skill level. Give it a go and taste the difference yourself!