Imagine waking up to the smell of freshly baked bread filling your kitchen—warm, crusty, and perfectly soft inside. What if I told you that you can make this happen with almost no effort and just a few simple ingredients?
This No Knead Bread Dutch Oven Recipe is designed for you, whether you’re a beginner or just short on time. You don’t need fancy skills or equipment—just a Dutch oven and a little patience. Keep reading, and I’ll show you how to create bakery-quality bread right at home, with a method so easy you’ll wonder why you ever bought store-bought loaves.

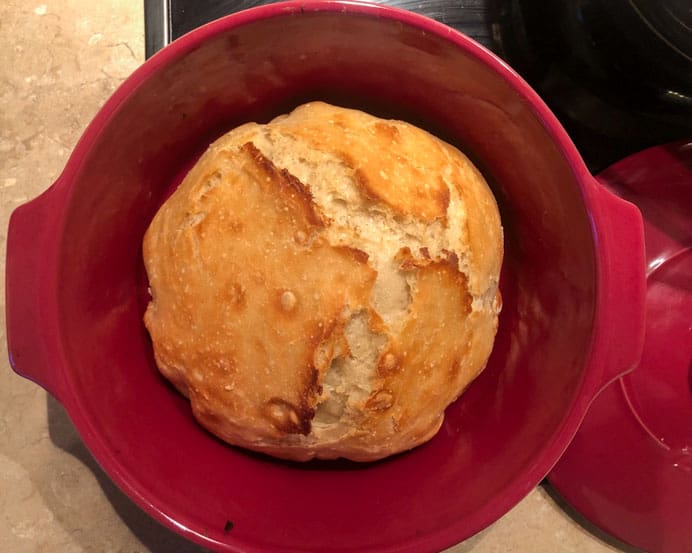
Credit: www.talesfromthekitchenshed.com
Ingredients For No Knead Bread
No knead bread is simple to make and needs few ingredients. It is perfect for beginners and busy cooks.
The ingredients are easy to find and require no special tools. You just mix, wait, and bake in a Dutch oven.
Basic Ingredients
The basic ingredients create the soft, crusty bread you want. Each one has a specific role in the recipe.
- All-purpose flour:The main part of the dough. It gives structure to the bread.
- Water:Hydrates the flour and helps form the dough.
- Salt:Adds flavor and controls yeast activity.
- Active dry yeast:Makes the dough rise by producing air bubbles.
Optional Add-ins
You can add extra flavors or textures to your bread. These add-ins make the bread taste special.
- Herbs:Rosemary, thyme, or oregano bring fresh taste.
- Garlic:Minced or powdered for a savory touch.
- Cheese:Grated cheddar or parmesan melts inside the bread.
- Seeds:Sunflower, sesame, or flax seeds add crunch.
- Nuts:Chopped walnuts or pecans give texture and flavor.
- Dried fruits:Raisins or cranberries add sweetness.
Choosing The Right Dutch Oven
Making no knead bread in a Dutch oven gives you a crispy crust and soft inside. Picking the right Dutch oven helps you bake the best bread.
There are many Dutch ovens available. Look at material and size to find one that fits your needs.
Material Options
Dutch ovens come in different materials. Each type affects heat retention and cooking style.
- Cast Iron:Holds heat well and cooks evenly. Needs seasoning to stay non-stick.
- Enameled Cast Iron:Easy to clean and does not need seasoning. It is heavier but works great for bread.
- Aluminum:Lighter but does not keep heat as long. Not the best for no knead bread.
- Ceramic:Looks nice and heats evenly but can be fragile and may crack under high heat.
Size Considerations
Choosing the right size Dutch oven helps your bread bake well. Too small and dough will overflow. Too big and heat may not be even.
Most no knead bread recipes work well with a 4 to 6-quart Dutch oven. This size fits a standard loaf and heats the dough evenly.
- 4-quart: Good for small to medium loaves
- 5-quart: Most popular size for home baking
- 6-quart: Best for larger loaves or multiple smaller breads
Mixing The Dough
Making no knead bread in a Dutch oven starts with mixing the dough. This step is simple and requires only a few ingredients.
The dough does not need much handling. The key is to mix everything until it forms a rough, sticky ball.
Combining Ingredients
Gather all your ingredients before mixing. Usually, you need flour, water, yeast, and salt for no knead bread.
Start by placing the flour, yeast, and salt in a large bowl. Stir these dry ingredients to mix them well.
Pour water into the dry mix. Use a spoon or your hand to stir the dough gently until combined.
- Use warm water, around 75°F to 80°F (24°C to 27°C)
- Pour water slowly to control the dough texture
- Mix until no dry flour remains
Achieving The Perfect Consistency
The dough should feel sticky and shaggy. It will look rough, not smooth.
Do not add extra flour to make it dry. The dough needs moisture to rise well in the Dutch oven.
- Sticky texture helps gluten develop over time
- Too dry dough can make the bread dense
- Use your hand to check if dough sticks lightly
Proofing The Dough
Proofing is a key step in making no knead bread in a Dutch oven. It helps the dough rise and develop flavor. During proofing, yeast ferments and creates bubbles.
Proper proofing makes your bread soft inside and crispy outside. It takes time and the right conditions to get it just right.
Ideal Temperature And Time
The best temperature for proofing dough is warm but not hot. Yeast works well between 70°F and 80°F. Cooler temperatures slow down the rise.
Proofing usually takes 12 to 18 hours for no knead bread. This slow rise helps develop flavor and texture. Avoid rushing the process.
- Keep dough covered to prevent drying out
- Use a warm spot like an oven with the light on
- Check dough after 12 hours for readiness
Signs The Dough Is Ready
Well-proofed dough looks puffy and has bubbles on the surface. It should feel soft and slightly sticky to touch. Press gently with a finger.
If the dough springs back slowly after pressing, it is ready. If it springs back quickly, it needs more time. Over-proofed dough may collapse.
- Dough volume doubles in size
- Bubbles appear under the surface
- Soft, slightly sticky texture
- Slow spring-back when pressed
Preparing For Baking
Making no knead bread in a Dutch oven requires some careful preparation. This helps the bread bake evenly and get a nice crust.
Before baking, you need to prepare the Dutch oven and shape your dough properly. These steps ensure the best results.
Preheating The Dutch Oven
Preheat your Dutch oven to make sure it is very hot before baking. This helps the bread cook quickly and form a crispy crust.
Place the empty Dutch oven with its lid in the oven at 450°F (230°C) for about 30 minutes. Do not skip this step.
- Use oven mitts to handle the hot pot
- Keep the lid on while preheating
- Do not add dough before preheating finishes
Shaping The Dough
Shape your dough gently without pressing out the air bubbles. This keeps the bread light and fluffy inside.
Turn the dough onto a floured surface. Fold the edges toward the center and form a round ball.
- Use just enough flour to prevent sticking
- Do not knead the dough again
- Let the dough rest before placing it in the Dutch oven
Baking Process
Baking no knead bread in a Dutch oven creates a perfect crust and soft inside. The process uses high heat and steam to bake the bread evenly.
This method is simple and needs little attention during baking. The Dutch oven traps moisture, helping the bread rise and develop flavor.
Initial High-heat Bake
Start by preheating the Dutch oven in the oven at a high temperature. This step creates a hot environment for the dough.
Place the dough carefully inside the hot Dutch oven. The heat helps the bread rise quickly and form a nice crust.
- Preheat oven and Dutch oven to 450°F (230°C)
- Place dough on parchment paper for easy transfer
- Put dough with paper inside the hot Dutch oven
- Cover with lid to trap steam and heat
Removing The Lid For Crispiness
After baking covered, remove the lid to let moisture escape. This step makes the crust crisp and golden brown.
Bake the bread uncovered for 10-15 minutes. Watch the crust closely to avoid burning.
- Bake covered for 30 minutes
- Take off the lid carefully
- Bake uncovered for 10-15 minutes
- Check crust color and crispness
Cooling And Serving
After baking your no knead bread in a Dutch oven, cooling is very important. Proper cooling helps the bread finish baking inside and keeps the crust crisp.
Serving the bread at the right time and with good sides makes the eating experience much better. Let’s look at the best ways to cool and serve your bread.
Cooling Techniques
Remove the bread from the Dutch oven carefully to avoid steam burns. Place the bread on a wire rack so air can flow all around it.
Cool the bread for at least one hour before cutting. This lets the inside set and stops it from becoming gummy.
- Use a wire rack for cooling
- Keep the bread in a dry, cool place
- Do not cover the bread while cooling
- Wait at least one hour before slicing
Best Serving Suggestions
Serve your no knead bread warm or at room temperature. Warm bread tastes soft inside and has a crunchy crust.
Pair the bread with simple toppings or sides to enjoy its flavor. Butter, olive oil, and cheese are excellent choices.
- Spread with butter or jam
- Dip in olive oil with herbs
- Serve with soups or salads
- Use for sandwiches with fresh ingredients
Credit: www.melaniemay.com
Troubleshooting Tips
No knead bread in a Dutch oven is easy to make. Sometimes, small problems happen during baking.
Knowing common issues and fixes helps you get better bread every time.
Common Issues
The bread dough may not rise well or the crust might be too hard or soft. Some loaves stick to the Dutch oven.
Sometimes, the bread inside stays doughy or the shape turns out flat instead of round.
How To Fix Them
If the dough does not rise, check the yeast and water temperature. Warm water helps yeast work better.
- Use fresh yeast for good rise
- Keep water temperature around 100°F (38°C)
- Let dough rest in a warm place
To avoid a hard or soft crust, adjust baking time and temperature. Use a preheated Dutch oven to create steam.
- Preheat oven and Dutch oven for 30 minutes
- Bake covered for the first 20 minutes
- Remove the lid to brown crust for last 15-20 minutes
If bread sticks to the Dutch oven, sprinkle flour or use parchment paper before placing dough inside.
For doughy bread inside, bake longer or check oven temperature with a thermometer.
- Use an oven thermometer to confirm correct heat
- Bake until internal temperature reaches 200°F (93°C)
- Let bread cool before cutting
Flat bread often means the dough was too wet or not shaped tightly. Use less water or shape dough with tension.
Variations And Flavor Ideas
Making no knead bread in a Dutch oven is simple and fun. You can change the flavors with easy additions. Small tweaks bring new tastes to your bread.
Try herbs, spices, toppings, or mix-ins to make each loaf unique. These ideas work well with the basic recipe.
Herbs And Spices
Herbs and spices add fresh and warm flavors to your bread. You can mix dried or fresh herbs right into the dough.
Good choices include rosemary, thyme, and garlic powder. Spices like cinnamon or caraway seeds also give a nice twist.
- Rosemary – adds a pine-like aroma
- Thyme – gives a mild, earthy taste
- Garlic powder – adds a savory note
- Cinnamon – gives a sweet and spicy flavor
- Caraway seeds – add a nutty, slightly peppery taste
Add-ins And Toppings
Add-ins and toppings change texture and flavor. Mix nuts, seeds, or dried fruits inside the dough for variety.
Sprinkle seeds or coarse salt on top before baking. This creates a crunchy crust and extra flavor.
- Add-ins: walnuts, sunflower seeds, olives, dried cranberries
- Toppings: sesame seeds, poppy seeds, coarse sea salt, oats
- Cheese bits like cheddar or parmesan can be mixed in for richness
- Chopped olives add a salty, tangy flavor

Credit: www.talesfromthekitchenshed.com
Frequently Asked Questions
What Is The Best Dutch Oven Size For Bread?
A 5 to 7-quart Dutch oven is ideal for baking bread. It provides enough space for the dough to expand while baking. This size also ensures even heat distribution, resulting in a perfect crust. Always ensure your Dutch oven has a lid to trap steam effectively.
Can I Use Parchment Paper In A Dutch Oven?
Yes, you can use parchment paper in a Dutch oven. It prevents the bread from sticking and makes transferring dough easier. Ensure the paper is oven-safe up to 450°F. Using parchment paper also aids in cleaning up, keeping your Dutch oven pristine.
How Long Should No-knead Bread Rise?
No-knead bread typically requires 12 to 18 hours for the first rise. This long fermentation develops flavor and texture. The second rise is shorter, around 1 to 2 hours. Ensure your dough has doubled in size before baking for the best results.
Why Is My No-knead Bread Dense?
Dense bread often results from insufficient rising time or low yeast activity. Ensure your dough rises in a warm place for adequate time. Check that your yeast is fresh and active. Proper hydration and gentle handling also contribute to a lighter, airy loaf.
Conclusion
This no knead bread Dutch oven recipe makes baking easy and fun. You need only a few ingredients and simple steps. The bread comes out crusty on the outside and soft inside. It fits perfectly for beginners and busy cooks.
Try it at home and enjoy fresh, homemade bread anytime. Baking bread does not have to be hard or take long. Give this recipe a chance and taste the difference. Warm, delicious bread is just a bake away.