
Are you struggling to connect your 3 wire gas wall oven cord because it’s not color coded? You’re not alone.
When wires don’t have clear colors, it’s easy to feel confused and worried about making a mistake. But don’t let that stop you from getting your oven up and running safely. You’ll discover simple tips to identify each wire correctly and avoid common errors.
Keep reading to make your installation smooth and stress-free.
Identifying 3 Wire Gas Oven Cords
Gas wall ovens often use a three-wire power cord for connection. Identifying these cords can help ensure safe installation and operation. This guide explains how to recognize a 3 wire gas oven cord, especially when it is not color coded.
Understanding the types of cords and their markings can prevent wiring mistakes. This is important for both safety and oven performance.
Common Cord Types
Three-wire cords for gas ovens can vary in appearance and design. Usually, they consist of two hot wires and one neutral or ground wire. The wires may be inside a flexible jacket or a rigid cable.
Some common types include:
- 3-wire power cords with black, red, and white wires
- 3-wire cords with black, black, and white wires
- Non-color coded cords with plain copper, silver, and black wires
Why Color Coding Matters
Color coding helps identify each wire’s role quickly. It shows which wire is hot, neutral, or ground. This reduces the risk of wrong connections during installation.
Color codes follow standards to keep wiring safe and consistent. Without color coding, electricians must rely on other markings or tests to find wire functions.
Signs Of Non-color Coded Cords
Non-color coded 3 wire cords may look plain or all one color. They might have metal wires that show no colored insulation. The wires can be bare copper or covered in black or white only.
Look for these signs to spot non-color coded cords:
- All wires have the same color or are bare metal
- No colored stripes or markings on insulation
- Labels on the cord jacket without wire color info
- Wires marked with letters or numbers instead of colors
Credit: www.diychatroom.com
Safety Precautions Before Fixing
Fixing a 3 wire gas wall oven cord without color codes can be tricky. Safety is very important to avoid accidents.
Follow these safety steps before you start any work on the oven cord.
Power Shutoff Steps
Turn off power to the oven before fixing the cord. This stops electric shocks.
Find the circuit breaker for the oven in the main panel. Switch it off completely.
- Locate the breaker panel
- Identify the oven’s breaker switch
- Turn the breaker to the OFF position
- Double-check power is off with a tester
Tools Required
Using the right tools makes fixing easier and safer. Prepare these tools before you start.
- Voltage tester or multimeter
- Screwdrivers (flathead and Phillips)
- Wire strippers
- Needle-nose pliers
- Electrical tape
- Wire nuts or connectors
Avoiding Electrical Hazards
Be careful to avoid electric shocks or short circuits. Follow these tips to stay safe.
- Always confirm power is off before touching wires
- Do not work in wet or damp areas
- Wear rubber-soled shoes to reduce shock risk
- Keep tools insulated and in good condition
- Do not guess wire functions if not sure
- Label wires clearly after fixing
Steps To Fix Non-color Coded Cord
Sometimes, a 3 wire gas wall oven cord does not have color coding. This can make it hard to know which wire is which. You must fix this problem to make the oven safe to use.
This guide shows how to check wires, assign their functions, and label them correctly for easy use later.
Inspecting Wire Connections
First, look closely at each wire in the cord. Check if the wires have any marks or labels. See if the wires are connected to the right places in the oven.
Look for any damage or loose ends. Make sure all wires are clean and not broken. This step helps avoid problems when you connect the wires.
- Turn off power before inspecting wires.
- Look for labels or metal tags on wires.
- Check the oven’s wiring diagram if available.
- Note any damage or wear on wires.
Assigning Wire Functions
Next, decide which wire does what job. Usually, one wire is for hot, one for neutral, and one for ground. Use a multimeter if needed to test each wire.
Match each wire to its correct function based on your tests and the oven’s instructions. This step ensures the oven will work safely and correctly.
- Hot wire carries electricity to the oven.
- Neutral wire completes the electrical circuit.
- Ground wire protects from electrical faults.
- Use a multimeter to find voltage on wires.
Properly Labeling Wires
After you know each wire’s role, label them clearly. Use wire markers or colored tape to mark hot, neutral, and ground wires. This helps anyone working on the oven later.
Labels must be easy to read and stay on the wire. Proper labeling keeps the setup safe and reduces mistakes in the future.
- Use red tape or label for hot wire.
- Use white tape or label for neutral wire.
- Use green tape or label for ground wire.
- Write clear tags if tape colors are not available.
Credit: www.diychatroom.com
Testing The Oven After Repair
After fixing a 3 wire gas wall oven cord that is not color coded, testing is very important. This ensures the oven works right and is safe to use.
Check electrical parts, gas flow, and safety before using the oven again. Each test helps avoid problems or hazards.
Checking Electrical Continuity
Use a multimeter to check electrical continuity in the oven cord and connections. This confirms wires are connected properly and not broken.
Test each wire from the plug to the oven terminals. Look for any open circuits or shorts to metal parts. Fix any issues found.
- Set multimeter to continuity mode
- Touch probes to cord ends and terminals
- Listen for beep or see zero resistance
- Check for no connection where it should be safe
Verifying Gas Functionality
Turn on the gas supply and light the oven burner. Check if the gas flows smoothly and the flame stays steady.
Watch for unusual smells or sounds that may mean leaks. Use a soapy water test on gas fittings to find bubbles indicating leaks.
- Open gas valve slowly
- Ignite burner safely
- Observe flame color and shape
- Apply soapy water to connections
- Look for bubbles showing leaks
Ensuring Safe Operation
Check that all safety features work before using the oven fully. Test the oven door seal and temperature controls.
Make sure the oven shuts off if the flame goes out. Watch for any sparks or unusual noises during operation.
- Test oven door latch and seal
- Set temperature and watch oven heat
- Turn off gas if flame extinguishes
- Listen for strange sounds or sparks
- Ensure ventilation is clear
When To Call A Professional
A 3 wire gas wall oven cord that is not color coded can be confusing. This may cause wiring mistakes. Knowing when to call a professional can keep you safe.
Electric wiring can be tricky. Some problems need expert help to avoid risks and damage.
Signs Of Complex Wiring Issues
If your oven cord wiring is unclear, you might see warning signs. These signs show the problem is more than a simple fix.
- Oven does not heat properly or at all
- Sparks or burning smells near the cord
- Frequent tripping of circuit breakers
- Loose or exposed wires inside the connection
- The cord feels hot to touch
Any of these signs means you should stop using the oven and get help fast.
Risks Of Diy Repairs
Trying to fix oven wiring yourself can be dangerous. Lack of knowledge can cause electric shock or fire.
Wrong wiring may damage your oven or home wiring system. It can also void warranties or insurance.
- Risk of electric shock or injury
- Fire hazards from poor connections
- Damage to oven or home electrical system
- Possible code violations and fines
- Higher repair costs if mistakes occur
Finding Qualified Technicians
Choose a technician with experience in gas wall ovens and electrical wiring. Check for proper licenses and insurance.
Ask for references or reviews from past customers. A good technician will explain the problem and solution clearly.
- Look for licensed electricians or appliance repair experts
- Check online reviews and ratings
- Verify insurance and certifications
- Request a clear cost estimate before work
- Choose someone who follows safety codes
Maintaining Your Gas Oven Cord
Your gas oven cord helps power the appliance safely. Keeping it in good shape is very important. This guide shows how to care for a 3 wire gas oven cord that is not color coded.
Without color codes, you must pay close attention to the cord’s condition. Proper care helps avoid electrical problems and hazards.
Regular Inspections
Check the gas oven cord often for any signs of wear or damage. Look for cracks, cuts, or frayed wires. These can cause shorts or fires.
Inspect the plug and connection points too. Make sure they are tight and clean. Loose connections can lead to sparks or power loss.
- Look for cracks in the cord’s outer layer
- Check for exposed wires or fraying
- Ensure plug prongs are straight and clean
- Confirm connection points are secure
Preventing Cord Damage
Keep the cord away from heat sources and sharp objects. Heat can melt the insulation, and sharp edges can cut the wires inside.
Do not stretch or bend the cord tightly. This causes internal damage that is hard to see. Store the cord carefully when not in use.
- Avoid placing the cord near hot stove parts
- Do not pull the cord to unplug it
- Keep the cord untangled and straight
- Use protective covers if needed
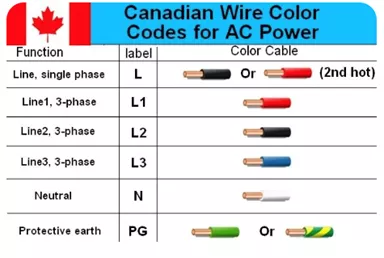
Upgrading To Color Coded Cords
Color coded cords make it easier to identify wires. This helps with safe installation and repair. Consider upgrading if your cord has no colors.
Color codes reduce the risk of wiring mistakes. They also speed up any future maintenance work. Ask a professional to install a color coded cord for safety.
- Color codes show which wire is live, neutral, or ground
- They help avoid wrong connections
- Make repairs safer and faster
- Improve overall electrical safety
Credit: www.premium-electric.ca
Frequently Asked Questions
What Does A 3 Wire Gas Wall Oven Cord Mean?
A 3 wire gas wall oven cord consists of three conductors: two “hot” wires and one neutral wire. This setup is common in older homes. It’s essential for connecting the oven to a power source safely. Always ensure proper installation to avoid electrical hazards.
Why Is My Oven Cord Not Color-coded?
Some oven cords are not color-coded due to manufacturing standards or older designs. Without color codes, identifying wires requires checking the manual or using a multimeter. Proper identification ensures safe connections and prevents electrical mishaps. Always consult an electrician if unsure.
How Do I Identify Uncolored Wires?
Identifying uncolored wires involves using a multimeter to check continuity and voltage. First, consult the appliance manual for guidance. This process helps distinguish between hot, neutral, and ground wires. Accurate identification is crucial for safe installation and operation of your appliance.
Can I Install A Non-color-coded Oven Cord Myself?
While possible, installing a non-color-coded oven cord requires electrical knowledge. It’s crucial to identify wires correctly. Mistakes can lead to hazards, so consulting a professional is advisable. Proper installation ensures safe and efficient operation of your gas wall oven.
Conclusion
A 3 wire gas wall oven cord not color coded can cause confusion. Always double-check wiring before installation. Use a tester to find the right connections. Safety matters most when handling electrical parts. Taking time to understand wiring keeps your oven working well.
Ask a professional if unsure about any step. Correct wiring helps avoid damage and keeps your home safe. Simple care can prevent costly repairs later. Stay careful and follow instructions closely for best results.